Gunnery guide: M1IP
Since its inception in the 1980s, the M1 series main battle tank has been one of the most iconic fighting vehicles in the western world. A veteran of numerous theatres and conflicts, this tank has proven itself both deadly and resilient, and its modern variants are expected to remain in service for years to come.
GHPC features the two earliest variants of the M1: the basic M1 and the M1IP (or IPM1), a stopgap model equipped with a dated 105mm main gun and an upgraded special armor package. The M1IP features most of the upgrades that would later appear on the 120mm-armed M1A1, but without the new smoothbore gun.
This guide will teach you how to use the M1 to its full potential in combat.
Overview
Unlike many contemporary tanks, which have maybe one strong trait and several weaknesses, the M1 appears to have it all. It's fast, well armored, highly survivable, and brings its firepower to bear with a sophisticated digital fire control system (FCS). In terms of single tank effectiveness on an '80s battlefield, it is absolutely without parallel.

A rather unique feature of the M1 series is its separate armored ammunition storage in the turret bustle. If the ammunition is ignited and the firewall and doors are sealed, the crew will be protected from the fire. This safety measure, combined with the exceptional frontal armor protection and well spaced internal layout, lets the M1 come back from hits that would be devastating to other tanks.

Above: The M1 is equipped with a "special armor" kit that provides strong resistance against most KE and HEAT threats along the frontal arc
Gunner's Primary Sight (GPS)
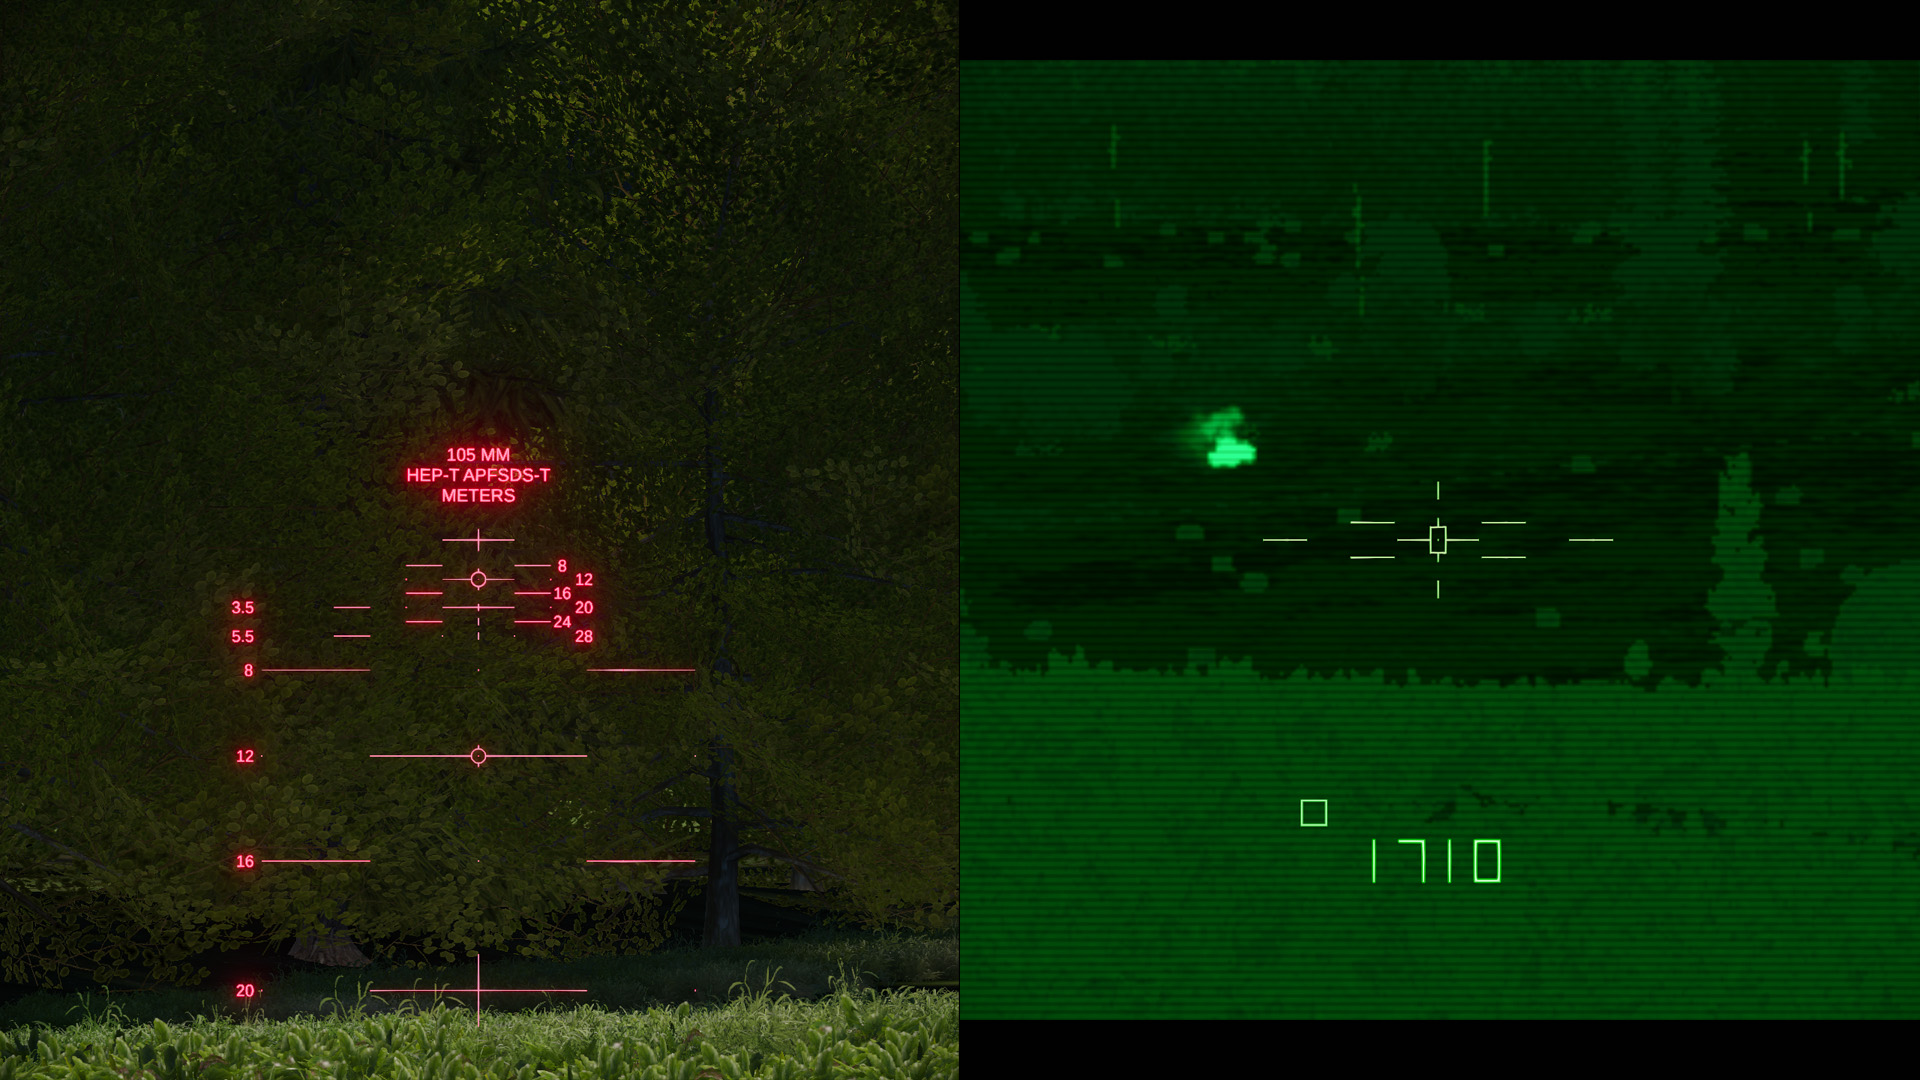
Engaging targets with the M1 is a blend of manual and computerized inputs, performed using the GPS. The operating principle of this sight is simple: rather than showing ballistic markings and requiring the gunner to read them, the system simply displays an aiming reticle and a range number. The reticle is dynamically placed in the gunner's view, shifted left or right to show the predicted impact point when lead is engaged. The main gun superelevates automatically, and the turret offsets for lead, so the gunner only needs to place the reticle on the center of the target and maintain a steady track to obtain a hit.

In addition to the reticle and range display, the GPS features some elements which appear only at certain times. The square icon above and left of the range display indicates that the gun is ready to fire (in practical terms, loaded and able to aim where the sight is pointing). There is also a small "F" symbol that can appear on the right if there is a fault in the FCS. In the real M1 series GPS, a solid bar over the numbers indicates multiple laser returns; however, this indicator is not modeled in GHPC at this time.

The gunner's sight also features the option to view the thermal imaging sight (TIS). This sight is highly effective for target detection out to long distances in day or night. All the aiming and feedback elements from the GPS day sight channel are present in the TIS narrow field-of-view mode, but in the wide field-of-view mode, the aiming reticle is replaced by a set of corner brackets showing what portion of the view will be covered by narrow mode.

As usual, you can switch gunner's sight channels by pressing the night sight key (default: T).
Laser rangefinder
The M1's FCS relies on the correct range to the target being registered in the system. To facilitate accurate range readings, the tank is equipped with a laser rangefinder (default: E). When activated, the rangefinder automatically engages the lead system and causes a superelevation update from the fire control system.
To aim the laser rangefinder, use the dot in the center of the GPS reticle. The aim point moves with the reticle when lead is induced.
Leading moving targets
As a modern tank with a digital fire control system, the M1 has fully automated lead compensation. All the gunner needs to do is achieve a steady track on the center of the target, lase, and fire. The gun aim direction will adjust slightly ahead of the target, and the GPS reticle will slide back to show the true aim point. This works in both the day sight and the thermal night sight.
Using the lead system can take a bit of practice but is well worth mastering, as it allows you to get consistent hits at long range when you or your target are moving at a steady pace. The procedure is best demonstrated by a video:
Lead is automatically induced when you use the laser rangefinder. If you wish to re-center the sight and stop compensating for lead, simply "dump lead" by momentarily releasing the aiming controls. This is akin to dumping lead with the actual gunner's palm switches in real M1 series tanks.
Gunner's Auxiliary Sight (GAS)
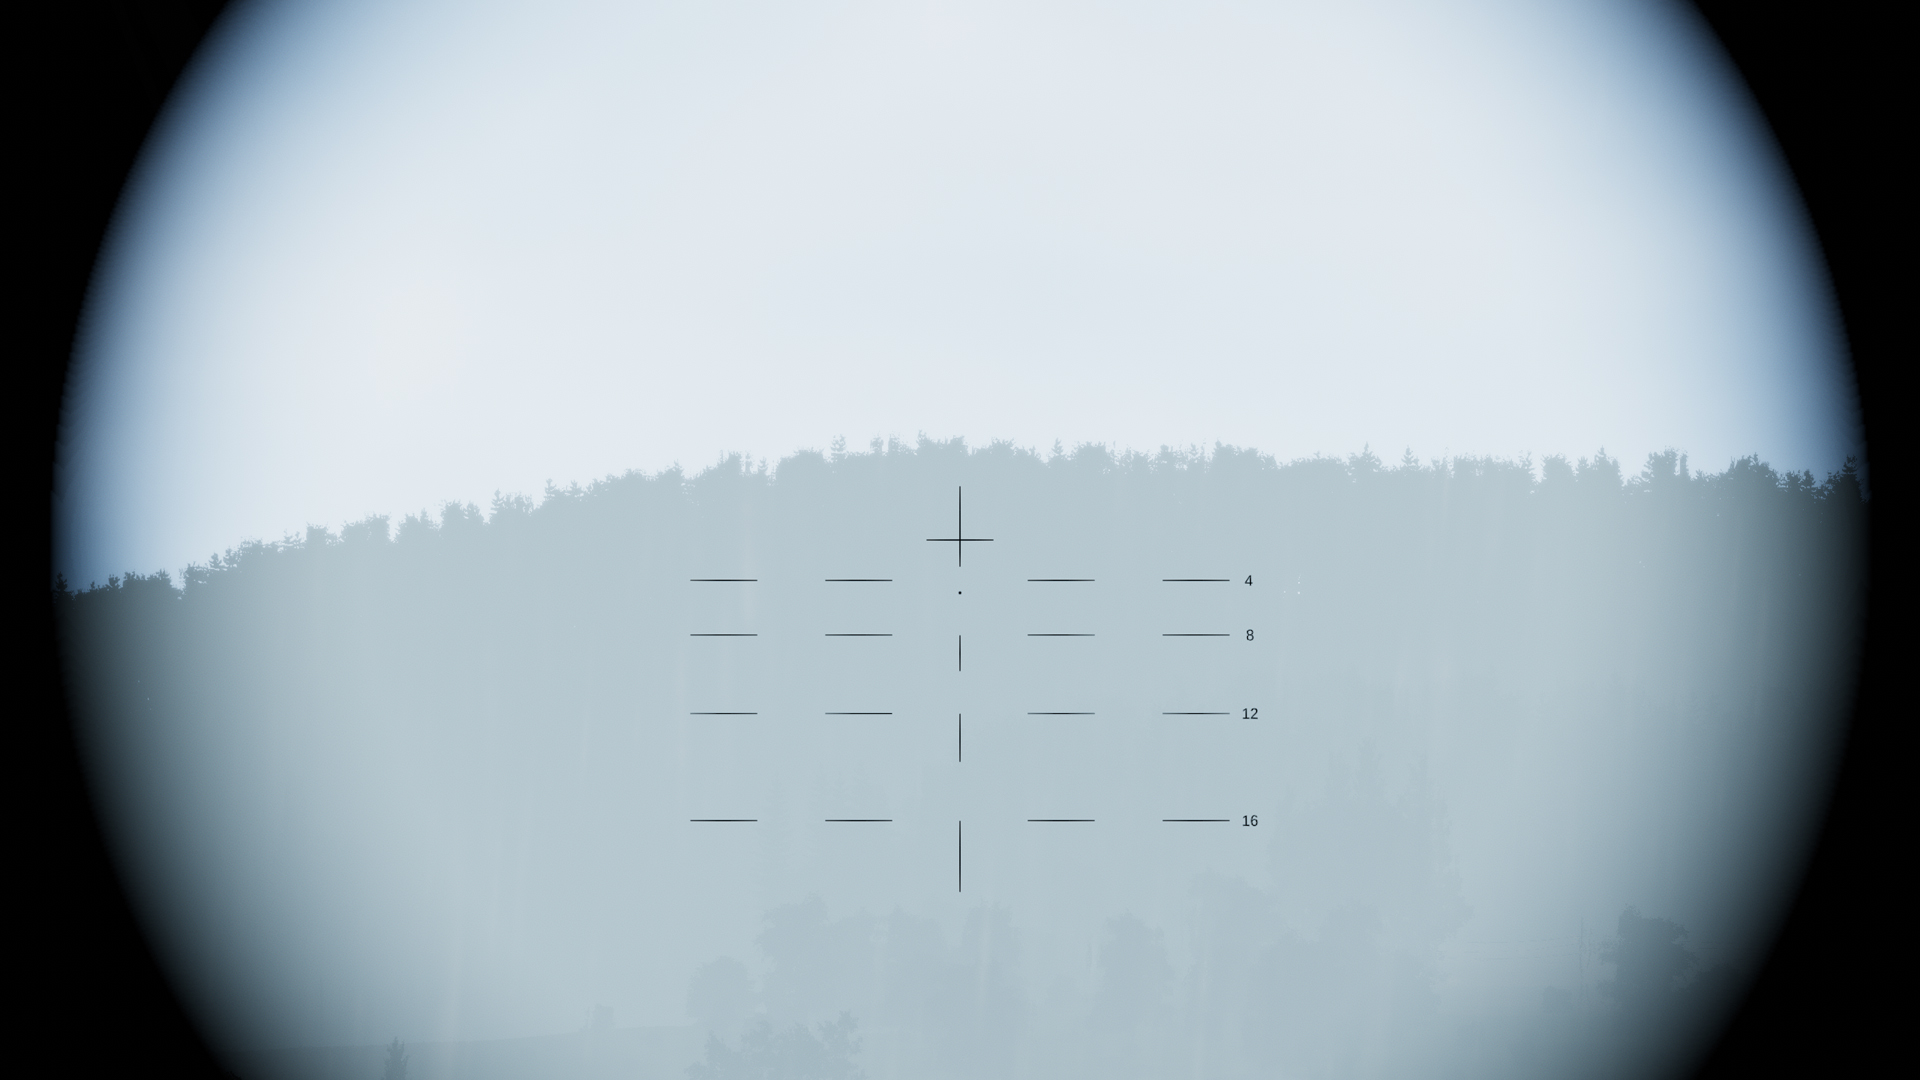
In case the GPS is damaged or the gunner needs to check terrain clearance on the main gun, the M1 is equipped with a backup sight, featuring fixed 8x zoom and ballistic drop markings. The sight can display either of two different reticle patterns, depending on which ammunition type the gunner indexes. (In GHPC, this process happens automatically based on the loaded ammunition.)

Above: The two possible reticle patterns for the M1IP GAS
The GAS includes a circle-dot marking at battlesight range (1200 meters). For any tank-sized target within 1200 meters, aiming low on the target with this mark should guarantee a hit. A stadiametric rangefinder at the top of the range scale provides a fallback option for engaging more distant targets.
Just like other etched optics in GHPC, the GAS can have its reticle illumination switched on and off (default key: i ).
Early M1 reticles

The earliest examples of the M1 were built with a slightly different set of gunsight reticles for the TIS and GAS. The thermal sight featured a vertical rectangle in the center of the reticle, while the auxiliary sight was marked for a combination of HEP and APFSDS on its primary setting. We've depicted these differences in GHPC's M1 as well.
Commander's Weapon Station (CWS)
The M1 features an M48 .50-caliber machine gun (a variant of the M2HB designed for vehicle use) installed in the commander's cupola. The weapon is remote-controlled and can be aimed and fired from under the armor. The trigger is activated mechanically, which can be seen from the commander's hatch view in the game.

A zoomed weapon sight allows the CWS to be effective against unarmored targets and helicopters at medium range with relative ease. The reticle uses fixed ballistic markings and cannot be illuminated.
As with all onboard weaponry in GHPC, the caliber-fifty is usable by cycling through the vehicle's weapons until it's selected (default key: F).
Ammunition
The M1 in GHPC comes standard with two highly capable main gun ammunition types: Armor-Piercing Fin-Stabilized Discarding Sabot (APFSDS or "sabot") and High Explosive Anti-Tank Fin-Stabilized (HEAT-FS or "HEAT"). The "sabot" round is best used against heavy armor, such as other tanks, as it flies fast with a flat trajectory and is capable of defeating all but the most advanced armor in the time period. For lightly armored targets and general purpose destruction, it's best to switch to HEAT, which offers decent blast damage and a shaped charge warhead that's capable of defeating even non-composite tank armor.

Above: Various types of 105 mm tank ammunition in GHPC, including the M774 (bottom), M833 (left), M900 (top), and M456 (right). Note the breakaway sabot petals and the armor piecing dart projectiles. The three "sabot" rounds pictured have cores made of extremely dense depleted uranium alloy for superior armor penetration.
A note on survivability
The frontal armor of the M1 is extremely strong compared to most other tanks in service in 1985, especially with the improved frontal turret armor of the M1IP variant. Nevertheless, it is still vulnerable to some threats, such as the latest Soviet ammunition carried by the USSR forces, or very close range hits to the lower plate with most APFSDS rounds.
By contrast, the side armor of the M1 is fairly weak to most anti-tank threats. The turret sides can resist low-powered HEAT munitions, as can the front sections of the hull sides, but everywhere else is fairly vulnerable. When crewing this tank, use caution to avoid being outmaneuvered. The frontal protection is top-notch, so make sure that's the only aspect the enemy sees.
For convenience, here is an approximation of strong and weak points for the M1IP when facing common APFSDS threats. (Red corresponds to areas that will reliably stop or deflect the round, yellow depends on range, and green will usually fail to stop it. Gray indicates that there is no path into the fighting compartment. Results may vary significantly depending on exact angles and distances. The best plan is to not get shot.)


Conclusion
As the flagship main battle tank for US forces in CENTAG in 1985, the M1 brings a fearsome level of capability into battle. When its assets and systems are used as designed, and proper tactics are employed to protect against flanking attacks, there is little that will stand in its way.
Thank you for reading, and we hope you enjoy playing Gunner, HEAT, PC!
